
SPHIRE Workflow


 This version (2019/07/29 16:03) was approved by twagner.The Previously approved version (2019/07/23 10:53) is available.
This is an old revision of the document!
![]()
CrYOLO is a fast and accurate particle picking procedure. It's based on convolutional neural networks and utilizes the popular You Only Look Once (YOLO) object detection system.
In this tutorial we explain our recommended configurations for single particle and filament projects. You can find more information how to use crYOLO, about supported networks and about the config file in the following articles:
We are also proud that crYOLO was recommended by F1000:
“CrYOLO works amazingly well in identifying the true particles and distinguishing them from other high-contrast features. Thus, crYOLO provides a fast, automated tool, which gives similar reliable results as careful manual selection and outperforms template based selection procedures.”
You can find the download and installation instructions here: Download and Installation
CrYOLO supports MRC, TIF and JPG files. It can work with 32 bit data, 8 bit data and 16 bit data. It will work on original MRC files, but it will probably improve when the data are denoised. Therefore you should low-pass filter them to a reasonable level. Since Version 1.2 crYOLO can automatically do that for you. You just have to add
"filter": [0.1,"filtered"]
to the model section in your config file to filter your images down to an absolute frequency of 0.1. The filtered images are saved in folder filtered.
crYOLO will automatically check if an image in full_data is available in the filtered directory. The filtering is done in parallel. If you don't want to use crYOLO's internal filtering, just remove the line and filter them manually. If you remove the line, don't forget to remove the comma at the end of the line above.
If you followed the installation instructions, you now have to activate the cryolo virtual environment with
source activate cryolo
In the following I will assume that your image data is in the folder full_data.
The next step is to create training data. To do so, we have to pick single particles manually in several micrographs. Ideally, the micrographs are picked to completion. However, it is not necessary to pick all particles. crYOLO will still converge if you miss some (or even many). One may ask how many micrographs have to be picked? It depends! Typically 10 micrographs are a good start. However, that number may increase / decrease due to several factors:
We recommend that you start with 10 micrographs, then autopick your data, check the results and finally decide whether to add more micrographs to your training set.
 To create your training data, crYOLO is shipped with a tool called “boxmanager”. However, you can also use tools like e2boxer to create your training data.
Start the box manager with the following command:
cryolo_boxmanager.py
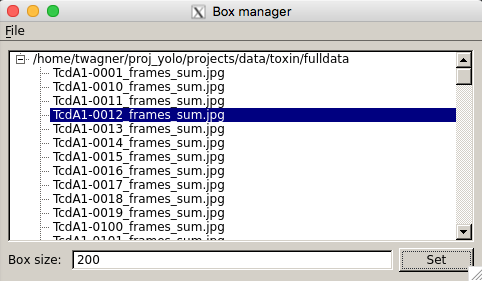
Now press File → Open image folder and the select the full_data directory. The first image should pop up. You can navigate in the directory tree through the images. Here is how to pick particles:
You can change the box size in the main window, by changing the number in the text field labeled Box size:. Press Set to apply it to all picked particles. For picking, you should the use minimum sized square which encloses your particle.
If you finished picking from your micrographs, you can export your box files with Files → Write box files.
Create a new directory called train_annotation and save it there. Close boxmanager.
Now create a third folder with the name train_image. Now for each box file, copy the corresponding image from full_data into train_image1). crYOLO will detect image / box file pairs by search taking the box file an searching for an image filename which contains the box filename.
You now have to create a config file your picking project. To do this type:
touch config.json
To use the Phosaurus network copy the following lines into that file:
{
    "model" : {
        "architecture":         "PhosaurusNet",
        "input_size":           1024,
        "anchors":              [160,160],
        "max_box_per_image":    600,
        "num_patches":          1,
        "filter":               [0.1,"filtered"]
    },

    "train": {
        "train_image_folder":   "train_image/",
        "train_annot_folder":   "train_annotation/",
        "train_times":          10,
        "pretrained_weights":   "model.h5",
        "batch_size":           4,
        "learning_rate":        1e-4,
        "nb_epoch":             50,
        "warmup_epochs":        0,

        "object_scale":         5.0 ,
        "no_object_scale":      1.0,
        "coord_scale":          1.0,
        "class_scale":          1.0,
        "log_path":             "logs/",
        "saved_weights_name":   "model.h5",
        "debug":                true
    },

    "valid": {
        "valid_image_folder":   "",
        "valid_annot_folder":   "",

        "valid_times":          1
    }
}
Click here to get more information about the configuration file
Please set the value in the “anchors” field to your desired box size. It should be size of the minimum enclosing square in pixels. Furthermore check if the fields “train_image_folder” and “train_annot_folder” have the correct values. Typically, 20% of the training data are randomly chosen as validation data. If you want to use specific images as validation data, you can move the images and the corresponding box files to the folders specified in “valid_image_folder” and “valid_annot_folder”. Make sure that they are removed from the original training folder! With the line below, crYOLO automatically filters your images to an absolute frequency 0.1 and write them into a folder “filtered”.
"filter": [0.1,"filtered"].
crYOLO will automatically check if an image in full_data is available in the filtered directory. The filtering is done in parallel. If you don't want to use crYOLO's internal filtering, just remove the line and filter them manually. If you remove the line, don't forget to remove the comma at the end of the line above.
Since crYOLO 1.4 you can also use neural network denoising with JANNI. The easiest way is to use the JANNI's general model (Download here) but you can also train JANNI for your data. crYOLO directly uses an interface to JANNI to filter your data, you just have to specify the path to your JANNI model, overlap of the batches (default 24), the batch size (default 3) and a path where the denoised images should be written.
To use JANNI's denoising you have to use following entry in your config.json:
"filter": ["path/to/janni_model.h5",24,3,"filtered"]
I recommend to use denoising with JANNI only together with a GPU as it is rather slow (~ 1-2 seconds per micrograph on the GPU and 10 seconds per micrograph on the CPU)
Please note the wiki entry about the crYOLO configuration file if you want to know more details.
Now you are ready to train the model. In case you have multiple GPUs, you should first select a free GPU. The following command will show the status of all GPUs:
nvidia-smi
For this tutorial, we assume that you have either a single GPU or want to use GPU 0. Therefore we add '-g 0' after each command below. However, if you have multiple (e.g GPU 0 and GPU 1) you could also use both by adding '-g 0 1' after each command.
Navigate to the folder with config.json file, train_image folder, etc.
1. Warm up your network
cryolo_train.py -c config.json -w 3 -g 0
2. Train your network
cryolo_train.py -c config.json -w 0 -g 0
The final model will be called model.h5
The training stops when the “loss” metric on the validation data does not improve 10 times in a row. This is typically enough. In case want to give the training more time to find the best model. You might increase the “not changed in a row” parameter to, for example, 15 by adding the flag -e 15:
cryolo_train.py -c config.json -w 0 -g 0 -e 15
to the training command.
You can now use the model weights saved in model.h5 (if you come to this section from another point of the tutorial, this filename might be different like gmodel_phosnet_X_Y.h5) to pick all your images in the directory full_data. To do this, run:
cryolo_predict.py -c config.json -w model.h5 -i full_data/ -g 0 -o boxfiles/
You will find the picked particles in the directory boxfiles.
If you want to pick less conservatively or more conservatively you might want to change the selection threshold from the default of 0.3 to a less conservative value like 0.2 or more conservative value like 0.4 using the -t parameter:
cryolo_predict.py -c config.json -w model.h5 -i full_data/ -g 0 -o boxfiles/ -t 0.2
However, it is much easier to select the best threshold after picking using the CBOX files written by crYOLO as described in the next section
To visualize your results you can use the box manager:
cryolo_boxmanager.py
Now press File → Open image folder and the select the full_data directory. The first image should pop up. Then you import the box files with File → Import box files and select in the boxfiles folder the EMAN directory.
Since version 1.3.0 crYOLO writes cbox files in a separate CBOX folder. You can import them into the box manager, change the threshold easily using the live preview and write the new box selection into new box files.

Here you can find how to apply the general models we trained for you. If you would like to train your own general model, please see our extra wiki page: How to train your own general model
Our general models can be found and downloaded here: Download and Installation.
The next step is to create a configuration file. Type:
touch config.json
Open the file with your preferred editor.
There are two general Phosaurus networks available. One for cryo em images and one for negative stain data.
For the general Phosaurus network trained for low-pass filtered cryo images enter the following inside:
For the general model trained with neural-network denoised cryo images (with JANNI's general model) enter the following inside:
In all cases please set the value in the “anchors” field to your desired box size. It should be size of the minimum particle enclosing square in pixel.
For the general model for negative stain data please use:
Please set the value in the “anchors” field to your desired box size. It should be size of the minimum particle enclosing square in pixel.
Just follow the description given above
As for a direct trained model, you might want to play around with the confidence threshold, either by using the CBOX files after prediction or use directly a different confidence threshold using the -t parameter during prediction.
Since crYOLO 1.3 you can train a model for your data by fine-tuning the general model.
What does fine-tuning mean?
The general model was trained on a lot of particles with a variety of shapes and therefore learned a very good set of generic features. The last layers, however, learn a pretty abstract representation of the particles and it might be that they do not perfectly fit for your particle at hand. Fine-tuning only traines the last two convolutional layers, but keep the others fixed. This adjusts the more abstract representation for your specific problem.
Why should I fine-tune my model instead of training from scratch?
However, the fine tune mode is still somewhat experimental and we will update this section if see more advantages or disadvantages.
You can use almost the same configuration as used when training from scratch. You just have to tell crYOLO to use the latest general model4) by pointing to it with the “pretrained_weights” options:
"train": {
    [...]
    "pretrained_weights":              "LATEST_GENERAL_MODEL.h5",
    [...]
    "saved_weights_name":   "my_refined_model.h5",
    [...]
}
In comparision to the training from scratch, you can skip the warm up training. Moreover you have to add the --fine_tune flag:
cryolo_train.py -c config.json -w 0 -g 0 --fine_tune
Picking is identical as with a model trained from scratch, so we will skip it here. Just follow the description given above
The fine tune mode is especially useful if you want to train crYOLO on the CPU. On my local machine it reduced the time for training cryolo on 14 micrographs from 12-15 hours to 4-5 hours.
Since version 1.1.0 crYOLO supports picking filaments.
Filament mode on Actin:


Filament mode on MAVS (EMPIAR-10031) :


 As described previously, filtering your image using a low-pass filter is probably a good idea.
After this is done, you have to prepare training data for your model. Right now, you have to use the e2helixboxer.py to generate the training data:
e2helixboxer.py --gui my_images/*.mrc
After tracing your training data in e2helixboxer, export them using File → Save. Make sure that you export particle coordinates as this the only format supported right now (see screenshot). In the following example, it is expected that you exported into a folder called “train_annotation”.
You can configure it the same way as for a “normal” project.
{
    "model" : {
        "architecture":         "PhosaurusNet",
        "input_size":           1024,
        "anchors":              [160,160],
        "max_box_per_image":    600,
        "num_patches":          1,
        "filter":               [0.1,"filtered"]
    },

    "train": {
        "train_image_folder":   "train_image/",
        "train_annot_folder":   "train_annotation/",
        "train_times":          10,
        "pretrained_weights":   "model.h5",
        "batch_size":           4,
        "learning_rate":        1e-4,
        "nb_epoch":             50,
        "warmup_epochs":        0,

        "object_scale":         5.0 ,
        "no_object_scale":      1.0,
        "coord_scale":          1.0,
        "class_scale":          1.0,
        "log_path":             "logs/",
        "saved_weights_name":   "model.h5",
        "debug":                true
    },

    "valid": {
        "valid_image_folder":   "",
        "valid_annot_folder":   "",

        "valid_times":          1
    }
}
Click here to get more information about the configuration file
Just adapt the anchors accordingly to your box size.
In principle, there is not much difference in training crYOLO for filament picking and particle picking. For project with roughly 20 filaments per image we successfully trained on 40 images (⇒ 800 filaments). However, in our experience the warm-up phase and training need a little bit more time:
1. Warm up your network
cryolo_train.py -c config.json -w 10 -g 0
2. Train your network
cryolo_train.py -c config.json -w 0 -g 0 -e 10
The final model will be called model.h5
The biggest difference in picking filaments with crYOLO is during prediction. However, there are just three additional parameters needed:
Let's assume you want to pick a filament with a width of 100 pixels (-fw 100). The box size is 200×200 and you want a 90% overlap (-bd 20). Moreover, you wish that each filament has at least 6 boxes (-mn 6). The micrographs are in the full_data directory. Than the picking command would be:
cryolo_predict.py -c config.json -w model.h5 -i full_data --filament -fw 100 -bd 20 -o boxes/ -g 0 -mn 6
The directory boxes will be created and all results are saved there. The format is the eman2 helix format with particle coordinates. You can find a detailed description how to import crYOLO filament coordinates into Relion here.
You can use the boxmanager as described previously.
The evaluation tool allows you, based on your validation data, to get statistics about your training. If you followed the tutorial, the validation data are selected randomly. With crYOLO 1.1.0 a run file for each training is created and saved into the folder runfiles/ in your project directory. This run file contains which files were selected for validation, and you can run your evaluation as follows:
cryolo_evaluation.py -c config.json -w model.h5 -r runfiles/run_YearMonthDay-HourMinuteSecond.json -g 0
The result looks like this:

The table contains several statistics:
If the training data consists of multiple folders, then evaluation will be done for each folder separately. Furthermore, crYOLO estimates the optimal picking threshold regarding the F1 Score and F2 Score. Both are basically average values of the recall and prediction, whereas the F2 score puts more weights on the recall, which is in the cryo-em often more important.
During training (cryolo_train), there are the following advanced parameters:
During picking (cryolo_predict), there are five advanced parameters:
Any questions? Problems? Suggestions?
Find help at our mailing list!


 Bettina Böttcher, Biochemistry, University Würzburg