Sidebar

Table of Contents
How to use SPHIRE's Cinderella for subtomogram selection
You can use Cinderella to classify Subtomograms into good/bad categories. This is useful if you want to sort Particles which were previously picked with e.g. template matching.
Training
To train cinderella we have to create training data. To do that, we extract the central slices from your tomogram (step 1) and select bad and good particles using eman2 e2display (step 2). In step 3 we train the actual model using cinderella.
1. Extract central slices
To extract the central slices from e.g. my_subtomograms.hdf and to save it into sub_central.mrcs run:
sp_cinderella_extract.py -i my_subtomograms.hdf -o sub_central.mrcs
2. Select good / bad training examples with e2display
- Start e2display from eman2 and select the central slice file (in our example
sub_central.mrcs). - Press ►[Show Stack] to display the file.
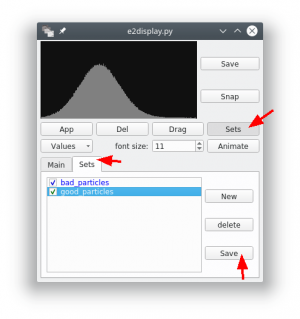
- Now click with the central mouse button (mouse wheel) on any particle. In the new dialog press the button ►[Sets] and select the tab “Sets”.
- There should already be a class “bad_particles”. Create a new class and name it “good_particles”. Highlight the set to which you want to add particle.
- If you now click on particles in the overview, they will be added to the currently selected set.
- After you finished the selection, press ►[Save] for each selected class. You should save the classes into separate folders (e.g.
good/andbad/). Both folders can contain multiple files (e.g. examples from another tomogram).
We typically start with 40 good and 40 bad examples.
3. Start training
After your created your training data, you can start the training ![]()
You need to specify all settings into one config file. To do so, create an empty file using
touch config.json
Copy the following configuration into the new file and adapt it to your needs. The only entries you might want to change are the input_size, good_path, bad_path and pretrained_weights.
- config.json
{
	"model": {
		"input_size": [32,32]
	},

	"train": {
		"batch_size": 32,
		"good_path": "good/",
		"bad_path": "bad/",
		"pretrained_weights": "",
		"saved_weights_name": "my_model.h5",
		"learning_rate": 1e-4,
		"nb_epoch": 100,
		"nb_early_stop": 15
	}
}
The fields have the following meaning:
- input_size: Each central slice is resized to these dimensions.
- batch_size: The number of images in one mini-batch. If you have memory problems you can try to reduce this value.
- good_path: Path of folder containing good central slices.
- bad_path: Path of folder containing bad central slices.
- pretrained_weights: Path to weights that are used to initialize the network. It can be empty. As Cinderella is using the same network architecture as crYOLO, we are typically using the general network of crYOLO as pretrained weights.
- saved_weights_name: Final model filename.
- learning_rate: Learning rate, should not be changed.
- nb_epoch: Maximum number of epochs to train. However, it will stop earlier (see nb_early_stop).
- nb_early_stop: If the validation loss did not improve “nb_early_stop” times in a row, the training will stop automatically.
The next step is to run the training:
sp_cinderella_train.py -c config.json --gpu 1
This will train a classification network on the GPU with ID=1. Once the training finishes, you get a my_model.h5 file. This can then be used to classify subtomograms into good / bad categories.
Prediction
To run the prediction on 'my_subtomograms.hdf' just on the GPU with ID=1 do:
sp_cinderella_predict.py -i my_subtomograms.hdf -w my_model.h5 -o output_folder/
In the output folder you will find two new mrcs files with the classified subtomograms. To check the results with e2display, you have to extract the central slices again (see Extract central slices).


